Below you will find the FINAL cinematic that i have created myself, the group decided they all wanted to mix and match the scenes differently and try making it in their own style, so This is my version of the Cinematic with sound. Enjoy...
Better quality version: https://www.youtube.com/watch?v=QFSqjfDn25A&feature=youtu.be
So the video is comprised of ten scenes, all of which have been seamlessly stitched together to try and create a very convincing animation. I think overall it looks really good, a lot more could have been added or edited, but I think that with the time we had and a group member leaving the university, it went great.
After Effects
So the way I made the entire video was through after effects, I was very sceptical about using this software at first because my knowledge of this software was and still is quite limited. But in a few hours of messing around, I started to work out exactly how layers work and I had some interesting stuff happening.

Above is a screen shot of my composition in after effects, it looks very complicated but actually it isn't, the most complex looking part is all of the layers.
The box on the middle left hand side is where you import all of your assets, its essentially a repository or a library. The bottom left box is the composition and layers box, This is where all of the magic happens. In here i have text, sound files, and all of my scene clips (ten in total).
The bottom middle box is the time sliders and it shows the length of the animations themselves. The colour red is for text, Green is for animations or video files and dark green is for sound files.
I will take you through the process that I used to get to this stage starting from the beginning. Getting a batch render of about 200 JPEG files into After Effects and turn it into a AVI movie.

First of all, when you have a new project, the layout should be pretty dull and nothing is going on, the first thing that i needed to do was import the first frame of the animation sequence, by doing this i would be able to "interpret" the rest of the data, but ill talk about that in a minute. The best way to import in terms of speed and time efficiency, is to double click on the box with the green arrow pointing at it in the picture above. When the file browser opens, find the first frame of your animation.
IMPORTANT: Every animation file must be named in exactly the same conventional manor. My files are named as Name. #. Ext, this means that the name is followed by a number which is followed by the file format.
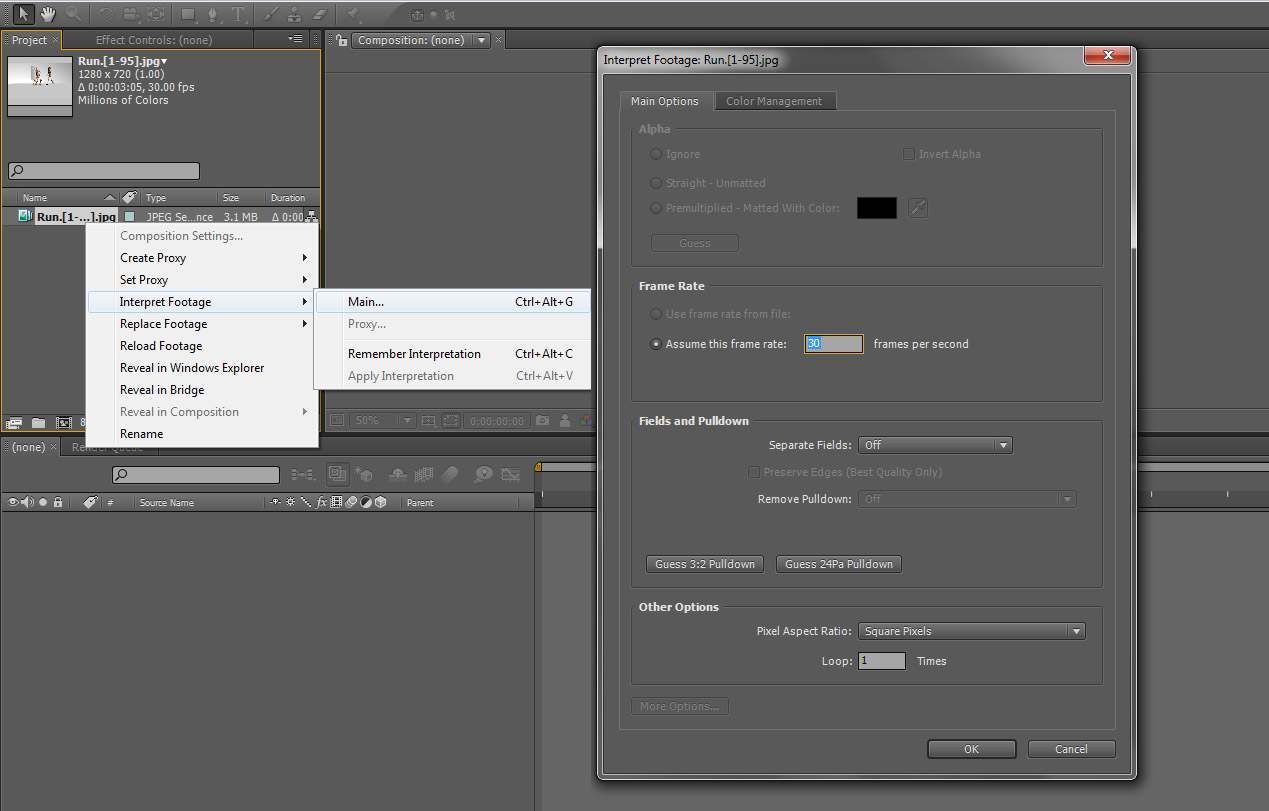
When this is done the next thing we need to do is interpret the footage, this means that the rest of the frames will automatically link to the first frame, playing them all.
By now you should see the first frame in the library on the left, right click it and hit Interpret Footage > Main.
Make sure you change the frame rate to 24 frames per second because the animations have all been rendered in real time (24fps) now hit OK.

You can scrub the time line bar which is located in the center and has all the seconds written on it. It should play through the whole animation.
 Next we need to create a composition, the reason we do this is so that we can make a movie out of all of the key frames the software has interpreted.
In the top menu bar click Composition > New, when a window appears make sure the following settings have been changed.
Composition Name - Scene 1
Preset - HDV/HDTV 720 25
Frames Per Second - 24
Duration - 4 minutes (length of the movie)

When the settings have been adjusted click OK.
Now on the left you can see that our composition has been made and is beneath the first sequence. Left click drag the sequence onto the composition, it should highlight.
You may also notice that the composition is in the bottom left panel which has now changed to a rendering panel.
Click on the composition on the left and navigate to the menu bar, clicking composition > make movie.
Now the bottom bar will have set the composition to be render-able as you can see in the image below.
Hit render and wait for it to finish, you will see the load bar processing as it renders out, and that covers how to render out each batch render you create using Maya starting form key frame one.

When the composition has rendered it will look something like this.
I hope this has helped anyone struggling to get to grips with after effects, and i hope this blog has encouraged others to experiment with their work flow as much as it encouraged me to throughout this huge learning curve. I can honestly say I am thrilled with the new knowledge i have learnt and am very excited to put it to the test over the summer.