Thursday 28 February 2013

Week 4 - Crouch Bridge & Presentation Planning

For this week I have been working on the presentation and planing everything that I will be presenting with my group during week six.

For this week I have been finalising the first Idle pose which turned out to be around 40 frames long, I feel like this is an ample amount of frames because the animation will be looping continuously to give the illusion of seamless animation.

Below is my crouch to idle, this shows my SWAT character breathing quite steadily and progresses with him bending his knees into a crouch. This will be the bridge between the next animation and will link to the extended idle pose. This animation isn't much but it will make all the difference and add variation to the movement in the overall scene.


This pose along with the extended idle is the preliminary pose to which the SWAT character kicks down the door which commences the animation. After the detective and the anonymous man will be sprinting to create an adrenaline packed scene.


Below are my Initial Poses which I used for a basic block-out, they are the silhouetted version of the crouch animation.
The animation above has a terrible codec which means the quality of my videos are terrible but please click the links to see the better quality ones.

The silhouetted poses really helped me to create a pose that looked convincing, overall I'm very happy with the result.

Saturday 23 February 2013

Week 3 - Graph Editor and Dope Sheet

Work Flow

It is a brilliant idea to start developing a personal and efficient working method when it comes to animating, try to use as many different rigs and tools, so you can really tell the difference between certain meshes and different control systems. Personally i love creating controls and building rigs and as you can see above i have put an image of my finished and rigged Zoe model which was supplied to us in my rigging module. 

By rigging a character i have really understood the principles as to how the body works, and should work, it has helped me with anatomy and for that I'm extremely grateful for the knowledge i have gained. 

Seeming as i am going to have to create four animations for the group work, A run idle, breathing idle, extended breathing idle, kick door idle and crouch idle. I will be developing my own particular work flow which i find most beneficial for me. Everyone is different though, some people like to live in the dopesheet and the graph editor, where as i am much more of a visual person, i do everything by eye and feel as opposed to using spline curves and tangents. 

It doesn't mean that you shouldn't understand the principles of the graph editor and dope sheet though, so today i am going to be delving into this subject area, showing you how the graph editor actually works. 

Setting up Maya
Before we do anything, We first need to set up Maya for our animation, the best way to do this is through the time line settings and preferences. As this will be a cut scene/in-game cinematic, we will be rendering out in Real Time at 24 frames per second, as opposed to playing every single frame of an animation which wont look a great deal realistic.  The best way to do this is by clicking the small box on the bottom right, when a window opens, click on the Playback Speed drop down and select Real time (24 fps).

The next thing we want to change, are the tangent settings, in the same window, click the animation tab then click the Tangent drop downs (there should be two) and change them both to spline. This means the control movements will be working on a curved motion basis.                                      So now that everything has been set we are good to go!
The main reasons we change our tangents to spline, is so we can help ourselves work out timing, it also makes poses look stronger.

Tip: The most important tip i can give an animator, is to KEY ALL, by not keying all of your controls, you could cause unnecessary in-between's and it could really ruin an animation, things like the feet sliding or hands moving unintentionally will occur if you don't key all. 
Its so easy to do and saves a lot of cleaning up, and assures you have a nice neat dope sheet, Click channels > Key All in the channel box, and done!.

Dope Sheet

This is an incredible tool and is very useful when you need to change timings of an animation, usually you key everything initially in 10 frame intervals, then when the animation is finished, you can space out the keys and make the timing seem more lifelike and realistic, this is what you use to portray follow through and anticipation, by slowing in and slowing out.

To access the dope sheet couldn't be any easier, simple go to Window > Rendering Editors > Dope Sheet (this is also where the graph editor is located.

On the images to the left you can see that i have included various dope sheet images, all from different animations, the one at the top is an example of a bad dope sheet starting out, there would be a lot of in-between's and there's a lot of negative spacing.

The second image is an example of a very good dope sheet, as you can see everything is keyed and in consecutive linear order, this is the best way to work when you are trying to set up poses. Timing adjustments come later.

The final image is an example of a dance animation I made a while ago and you can see that is has some keys repositioned and gaps, but it works and in-between's are good.

Most animators like to offset their characters motions, for example, if you was walking in a straight line, your body wouldn't be rigid and stiff, it would be loose and your center of gravity would shift left and right distributing weight constantly and differently in each body part. This is also called twinning, its the intentional manipulation of a set of controllers where you make things look asymmetrical. It adds variety and flair to ones work.

Graph Editor

This is a brilliant tool, and most traditional animators are visual but modern day animators tend to use the graph editor a lot because it introduces a form of technicality and complexity to the arrangement of an animation. Its a beautiful piece of kit when it comes to editing key frames and tangent weights.

To open the graph editor you do it exactly the same way as you did with the dope sheet, Click Window > Rendering Editors > Graph Editor.

When the graph editor opens it will look like the image on the left. As you can see all of the tiny lack dots are the different key frames, and the lines connecting between them are the tangents.

As the time slider travels across a tangent, depending on how the tangent is set up, it will affect the animation sequence.

The first image is just a basic key frame on every controller but the controllers haven't been moved so the tangents are all very linear.  The second image shows my kick door animation which as you can see, the tangents are more curved.

As you can see in the image to the left, there are many controllers in the left hand panel, Ill go ahead and select the foot control and it will get rid of most tangents because i have selected a specific one. It will show curves for Translation, Rotation and Scale. The colours correspond to each axis. Yellow being Y, Blue being X and red being Z axis.

Next we are going to be talking about changing tangents. Before i delve into the controls, the first thing i want to show is how to select the actual tangent key.

As you can see in the image, i have selected the middle key for the Rotate Y curve as its the most extreme curve and will serve as the best example.

When you select the key you can see two handles either side, these tangent handles change the curvature of the spline.

As you can see in the left image, I have selected one handle and it is changing both sides of the curve as I rotate it, this is due to it being set to "unity Tangents" but this isn't what I want.

I want to change just one side of the curve, so a way to do this is to "Break Tangents". To do this we need to select the key, then select one of the handles and navigate your way to the top menu bar where you will see lots of different options which will affect the curvature of the spline.


On the left you can see that I have selected one side of the handle and hit break tangents which you can see is highlighted at the top of the image. By clicking this it will allow us to manipulate just one side of the tangent handle, affecting only one side of the curve.


Here you can see that I have broke the tangents (you can see break tangents selected at the top now instead of unify tangents).

This is very useful for offsetting your characters movement paths, and it is a very efficient way of fixing animation cycles and editing your poses.

Below are some more tools that will prove themselves useful. Step Tangents is incredibly useful because it allows you to see your major key poses without any in-between's, it jumps straight to the main key frames so you can make sure you have a strong stage.

When you are finished you can change back to spline curves then work on the in-between's.


Below are some basic ball animations that i have created using the graph editor, I wont be going into extensive detail and they are just for show because this is something I looked into in my first year of uni, if you would like to read more about it here is the link to my original blog. It talks all about squash and stretch, ghosting and much more.

URL: http://oliverstott.blogspot.co.uk/2012/02/basics-of-animation-in-maya.html

So moving on, Here is the first ball animation I made, I apologise for the terrible quality. Blogger doesn't like my own videos sadly.


So in this video you can see that I have created a basic ball animation which shows ghosting,

This effect is very easy to achieve, simple Click Animate > Ghost Selected and it will show you the motion trails behind the main object and you can see exactly what is happening.
Its excellent for spotting in-between's and any faults the animation may have, it allows for easy use of tweaking.

In this next animation you can see that i have created yet another bouncing ball animation, but this implements all of the features of squash and stretch, it is a basic test that everyone should create, just so they get a better understanding of the principles of animation techniques. Squash and stretch is easily achievable through simply scaling an object and key framing the channel box attributes.

Thursday 21 February 2013

Week 3 - Idle Breathing & Setting up Poses

This week Sam went through a presentation that portrayed multiple ways to execute a pose. She described the different factors of creating an effective and dynamic stance which in turn would affect the overall mood and contrast of the animations I will be creating.

Some of the things we covered revolved around simple animations, like a man pushing a box. Depending on how the box is pushed, the curvature of the spine will depict the follow through of the character who is pushing forward.

As you can see above, having the spine curved in suggests the box isn't as heavy as opposed to having the spine protruding out, if the spine is the opposite it suggests strain and the tensing of the body. 
Changing the attitude of the body has a great impact on how the external object will be translated, be it light as a feather or extremely heavy. 

Some of the things that were also covered are things we learnt from last year but it was basically a refresher. I found that lots of little things can make the biggest impact, for example, avoiding twinning, a very symmetrical character can be quite a dull and boring character to look at, its good to be asymmetric.
Key framing is also very important, by keying the things you change doesn't mean that everything else shouldn't be keyed. If the time slider is moved when everything else isn't keyed, the animation can fall sideways and cause you problems.

Tips: Key everything, this is simple simple go to the 'Channel Box' and hit 'Channels > Key All'.


Planning the Pose

Planning is essential for a strong effective pose, to create something marvellous and believable you need to think about certain factors of a animation and break it down into size-able chunks.

There are lots of different ways of approaching an animation after planning it out, but the way i like to do it, is how i was taught by Sam my lecturer in my first year, we are also retouching on it this year.

It involves phases of animation, say for example I was animating a sports character swinging a bat; I would start by planning it as follows:

Idle Pose - This would be the pose that you see when the character is holding the bat in a relaxing state.

Idle Extended - This pose is self explanatory, its the same as the above but has more frames and there are move varied movements such as the head turning or the arms moving.

Anticipation - This is the preliminary stages before the bat is about to swing, eventually leading up to the swing.

Impact - This is the stage where the bat would hit the ball and in this case, there would be a small sudden shock through the character to portray a strong hit.

Follow Through - This is the stages after impact and anticipation, where the character would bring the bat down to a lower state just before he reaches a less tense state.

Idle - This would be the same pose as the first, the character would be fully relaxed and at ease again.

So as you can see there are lots of different stages that can really affect how a short cinematic could be played out.

I will put an animation below of my first Idle pose which will portray my SWAT character in a idle state. I have gone to the effort to gather primary research for idle breathing, I filmed Alex in my group doing an idle then leading on to extended idle, this proved useful as i was able to use the video as a point of reference. By doing independent research, it also helps you understand anatomy more and how the body works.

These are fundamental poses and all animations use them for realism, I will also be including silhouettes of the character pose so I can show it is believable.


Below you can see my first idle, it is only 40 frames long and that is all it needs to be because the start and the end frames are the same, which means they can be looped and last say 160 frames or more using the Trax editor. I will go into this in extensive detail soon.


Below you can see a silhouette of the idle breathe, the pose is very strong and easy to read because everything is nicely spaced out and there isn't any negative spacing. This is the key to finding a strong pose, by asking yourself, Does it look readable?

Trax Editor 

This is Maya's very own animation tool, in most cases it is a lot more powerful than the graph editor or the dope sheet as it allows you to arrange you different sequences of animation clips, and stitch them together seamlessly. This allows for a very accurate illusion of continuous movement. 


As you can see above, the Trax editor is broken up into different time lines, you can import animations, sound files, image files and its all very customisable and easy to use. The time line showing your key frames is along the bottom, whilst the main menu is at the top. It is within the track control area where the magic happens though, all of those blue and green blocks are animations, positioned carefully, as you can see each animation tends to follow the one prior in a consecutive fashion. 

I will now go through the Trax editor process and who you exactly how its used step by step. When Sam showed us this I decided it would be better to try and experiment with it a little more so i decided not to use the Max for Maya rig but instead, i used the Norman rig. I prefer this rig and i would like to try following the same tutorial but using different mediums. 

So the first step is to select the character itself and left click on the root controller which everything is parented to. In this case its the base controller. 

As you can see on the left, I have selected the master controller, the only problem being, is that not all of the keys for every controller are showing, this is due to the hierarchy, the most simple way to fix this is in the next step. 


In this step you can see that I have selected all of my hierarchy now and all of the key frames have appeared. 
The easiest way to do this is by clicking Edit > Select Hierarchy this will make all key frames appear. 


Next we need to create a character set, this will make a record of all keyed out frames and relate each frame to the controller it corresponds with. In a nutshell, it records the rigs animated motion paths. 
The way to do this is by changing the tool bar tab to Animation, Next hit Character > Create Character Set > (Box)


Now that we have done that, make sure the settings are exactly as follows. 

> Change Name Box
> Select All Hierarchy Below Selected Node
> Check All Keyable

Finally click Create Character Set

When the character set has been created, you will see the channel box go yellow, if this doesn't happen go back and look over some of the previous steps as you may have missed a stage. 

Now to get into the Trax Editor. 


Now that we have created the character sets we need to delve a little into the Trax Editor.

The easiest way to access this piece of kit is by using the following steps. 

Click Window > Animation Editors > Trax Editor.

A window should appear.


Once a window has appeared, navigate your way to the upper menu and search for/click Create > Animation Clip > (Box)


These steps are very important, make sure the following settings have been selected and you have double checked, this can really interrupt your work flow if you select anything wrongly by mistake. 

> Change Name Field
> Select Time slider
> Select Put Clip in Trax Editor and Visor

Once you have created the animation clip, it will appear as a blue box as you can see in the image to the left. 

Now that the animation clip has been created, we need to export it so it can be used over and over.

Next go to File > Export Animation Clip


When the files have been exported, we then need to import the animation back in.

To do this go to File > Import Animation Clip to Characters


The animation should appear in the view box.


Now that the animations have been imported, you should have two of the same cycle imported. This means that you can now position the animation clips by simply initiating a Left Click and Drag.

Also at the bottom left you will see your anim's layer, as you can see mine is set to SWAT. This isn't very important to know now but when you      are working with more advanced techniques, its a handy thing to know about, because you can differentiate what layers you are working with.


Another little trick you can do is change the actual frames of the animation, as shown in the image to the left. You can easily cut clips by simply Left Click Dragging the small box in the top right corner of the animation clip.


Blending animations allows for two animations to edge in and out, this will create a nice transition between the two. To do this Right Click > Blend > (Box).


Once the window has appeared, click the drop down menu labelled Initial Weight Curve and click Ease In Out.


This pretty much concludes the Trax Editor, i hope it has been insightful and useful to those who read this blog, I found it very useful and it is how i produced the long breathe cycle in the video above.

It is a very powerful tool and one to definitely be mastered, It can save time and stress too!

Thursday 7 February 2013

Week 2 - Animation Pipeline

Today I'm going to talk a little bit about the modern day animation pipeline, and the processes involved when creating in-game animations and cut scenes. Now days every process is filtered and very procedural because time contingency isn't something companies have a lot of, so efficiency and being proficient in what you do is a very appealing to most company's looking to hire.


Above is an image which gives a good idea of the different stages involved when creating a sequential animation. These ideology's are adopted from thousands of company's all around the world because they work.  

Seeming as our group is working on a project on a much smaller scale, we will be focusing on only a few things for our animation hand in, and they are the following. 

Story

This is the stage where me and my group compose story's and try to come up with a convincing idea that will really grab the target audiences attention. Questions we might ask ourselves would be.

What is the overall mood going to be?
Will it be mellow or upbeat?
Will it be a slow action scene or a fast paced chase scene?

All of these questions are important in the role of the pre-production phase where we come up with the initial idea and try to produce something that looks interesting. 

We decided to go with an action scene. 

Character's

Once we had the story roughly blocked out, we had to figure out how many characters where would be and who would be the lead protagonists. Through these characters we would stage the show and the story would be related and expressed through them, so this stage is very important at trying to find a basis on which to build the animation on. 

We decided we wanted a SWAT character (that could be duplicated around) a Detective and an unidentified man who would be the prime suspect of this chase scene. 

Art Direction

This stage was also important, it is what lead us to figure out what kind of direction we wanted to go with, be it abstract, cartoony or realistic, by asking each other questions and bouncing off each other we came to our decisions.

We decided that we wanted to do a chase scene what would be adrenaline packed and showed a high level of realism. 

Storyboard & Compromise

Once we mapped out our ideas, we now had to create a visual representation of what our story would look like, we all made different storyboards then came together as a group, we decided that we would try to mix our ideas together. 

This is my Storyboard.


Animatic

Once we had the storyboard ideas, we decided that we would all do our four separate animations sticking to one character each for simplicity and efficiency. It we were all animating on each character, the clips would look inconsistent with each other. 

I decided to do the following animations:-

Idle_Breathe_01
Idle_Breathe_Extended_02
Idle_Crouch_Bridge
Kick_Door_01
Run_Cycle_01

Lighting

This is a very important stage, it can capture the essence of whatever emotions you are trying to portray, and it can make or break an animation completely if you use lighting incorrectly. 

To create dramatic effect me and my group decided to use bright lighting and dark lighting to show juxtaposition of feelings and emotions. Most of the animation is inside so we wanted it to have a dark feel, without making the scene look visually dark. 

To achieve this we experimented a lot with spot lights, and I built the environments which allowed for us to experiment with things such as ambient occlusion textures to get an all white effect, in the end we didn't go with that idea exactly but we did use it in the initial running scene. 

Rendering

When we were rendering we wanted to make sure that everything came out quite bright with a dark feel to it, we managed to create a very convincing scene and we are very happy with the results. 

We rendered our scene in full HD 1024 resolution, with ray tracing and we also used mental ray instead of Maya's own software renderer. This meant that we were able to create better batch renders and we could fully control lighting, shadows and gradient lighting effects, including motion blur and luminosity.

Composition

This is where we take the renders and throw them into some sort of software package, most people with no experience of software use windows movie maker which is terrible software, i decided to stitch my animation together using after effects, which I found very beneficial and i learnt lots of quirky new tricks. 

Friday 1 February 2013

Week 2 - Principles of Animation

So before i really start to delve into my animation project, Firstly I would like to look back a little and talk about the main principles of animation that I learnt about in my first year of university.

The principles I will be covering are the basis of which all modern and old animation techniques are build upon. The main principles are broken up usually into twelve different areas. All of which are incredibly relevant to today's production pipelines, be it in game's development or film animation.

The following methods are:-

- Squash and Stretch
- Anticipation
- Staging
- Straight Ahead and Pose to Pose Animation
- Follow Through and Overlapping Action
- Slow-Out and Slow-In
- Arc's
- Secondary Action
- Timing
- Exaggeration
- Solid Drawing
- Appeal

These are the twelve main principles of animation but this applies to the traditional arts, as well as the computer generated side of things. So some things may not apply as much as others but they are all great tools to use, baring lots of knowledge that can be harnessed to improve your own animations, an to help others understand the arts.

Squash and Stretch

So where to start? This is the foremost and main principle of animation, squash and stretch is the process or action which gives the illusion of weight of volume in animation. It is used in many things, and can be seen throughout every day life, you just need to observe it. It is used for characters and objects, but can also be used for dialogue and facial expressions.

Depending on what your trying to create, be it realistic or completely exaggerated, squash and stretch techniques not only provide a level of detail and believable realism, they also bring whatever your trying to animate to life.

Below is an example of squash and stretch being applied to a ball, as you can see as the ball descends from the air and lands, it deforms, this is squash and stretch, its the deformation of an object, making it look more organic and realistic.

The trick to this technique, is to understand the different elements entailed with squash and stretch. For this process to take place, there need to be certain attributes that exist, let me elaborate. 

First of all, as simple as it may sound it is a very important part of this process, what is the material the ball is made out of? The material dictates how the ball will bounce. 

Is it Spongy?
Is it Hard or Soft?
Is it Rubbery?
Is it Solid metal?
Is it Fragile?
Is it Light of Heavy?


After you have figured this out, you will be able to think about the next phase.

Force This dictates the power of which the object has been thrown or projected. Depending on how hard a ball is thrown, it will change the strength of the force, which will bring us to the next phase.

Gravity, as the ball peaks and starts to fall, It will start to rapidly build up speed and down force which inevitably will determine how strong the collision will be with said object or surface.

Impact, this will be when the ball hits a surface being the wall or floor. When the ball hits the floor all of the down force and the gravity will cause an impact so powerful it will actually deform the shape of the object, depending on its material.

Squash, whence the ball has made impact, it will deform and start to deform into a less round shape, it will become more oblong and flat, this is due to the G-force that follow through with the impact.

Stretch, When the ball starts to lose its down force and the power eases up, the ball will initiate a bounce and as it starts to rise, the ball will stretch a little more and then life of the ground in rapid succession.

These are the main elements to consider when animating a simple animation, this can apply to a character jumping, breathing, or walking, once this technique has been mastered, you will be able to translate a pose very sufficiently.

Anticipation

This is a very important part of executing a pose or an animation. Anticipation is the build up from an idle pose which portrays to the viewer that the character is about to execute an action. Below is an image of a small jump cycle, but it denotes the different stages of this technique.


As another example, If a character was about to hit a ball with a baseball bat, the anticipation stage would be where the player pulls his arms back and gets ready to actually physically swing the object.

It is the preliminary stage of an event that is about to take place, this technique is excellent because it prepares the viewer and it is more eye catching and allows for a lot of build up, which of course invokes drama and suspense.

Staging

This process is all about the audience and the perception of the character, films don't last forever in fact they are quite short, so the main goal is to consistently link he characters emotions to the storyline, this helps the viewer to relate to the character. The character should never be executing too many actions at once as it may confuse the target audience or send mixed messages, sometimes simplicity is the key.


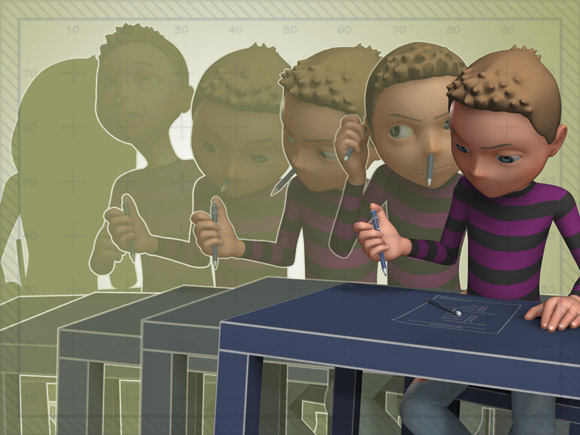
Staging is the process in which an animator tries to translate the mood, expression, inner feelings and the overall theme of the characters emotions. 

As you can see in the image above the boy looks unhappy as he is having to do something he doesn't enjoy, this case being something as small such as homework. The point of this exercise though, is that by looking at that one image, you can easily understand what is going on with in a split second and you can relate to it. 

Staging is the process of portraying emotions perfectly  usually using facial expressions, to strike inward feelings such as sympathy  empathy, compassion, laughter, hatred, and much more. Combined with other things such as colours, so dark greens and reds for evil, and light blues or yellows for good, you can define a character instantly without a second thought. 

This is staging, and it is a very powerful technique and easy to understand. 

Straight Ahead and Pose to Pose Animation

Straight ahead action is the process in hand drawn animation when the animator creates a drawing at the first frame until he has reached the very last thus ending the scene. This technique is very interesting because it creates very zany looking animations because its not very accurate, so there is quite a lot of twinning going on. It is usually used for very wild and energetic chase scenes with lots of action sequences happening such as explosions.


As you can see above, lots of frames are skipped, it jumps straight to the main key frames so there isn't much in-between's involved, but that doesn't mean to say there isn't any!.

Pose to Pose is where the animator carefully plans the animation sequences. So for example, the animator will draw the main key frames, add some in-between frames then proceed to finalise the animation and add more in-between's. This method is a lot more accurate and more thorough. This method is key for timing also.
In the above image you can see in detail the in-between's that take place as the character walks forward to pick up an object. This is pose to pose animation.

Follow Through and Overlapping Action

Follow through is a method used to give the illusion of continuous flow of movement after a action has taken place.

For example, is a golfer gets ready to swing a golf club, that would be the anticipation, as the club comes down and hits the ball, that would be the event, but in reality the club wouldn't stop there it would follow through. This means that the golf club would swing even further following the center of gravity of the character and the golfers arms would be raised high up in the air. His arms would then descend and reach a relaxing idle state.

The image above shows a javelin being thrown, this entire sequence portrays follow through perfectly, it is the action that takes place after the even there the character climaxes and then reaches a plateau and goes into an idle pose. 

Overlapping action is similar to follow through, but at the same time, its an entirely separate entity of its own. It is the stages of when a character shifts their weight, or changes direction, and as the character moves, certain elements of them cant keep up, such as hair, clothes and fabrics. All of these things are off set, they are animated with "Drag" which basically means that if a character was to spin, their hair would shortly after follow round, creating a swirl effect with the hair. This method is used subtly in most animation. 

A good example would be of Goofy, when he jumps his ears flop in different directions, this gives more character to the animation itself and makes it look more fun, interesting and eye-catching for the audience. 

Slow-Out and Slow-In

This is an important process and vital to timing, it is where the spacing of key frames take place and it allows for the animator to give the illusion of velocity and speed.


Below you can see the process of a ball bouncing, the way slow-in and slow-out would effect this is in the anticipation and the follow through stages. As the ball is flying through the air from frame one, the speed is going to be immense so it would travel quite fast, as it starts to fall that is when slow-in would start to affect the animation. As the ball hits the floor and rises again speed would start to build up, so slow out would come into this part, and as the ball proceeds onto its second bounce slow in would yet again be applied.

It is a very effective way to help animations look affective and it can really benefit the long run of an animation if you hit it head on at the start.

Arc's

Arc's are all about expression they dictate the fluid movement from one extreme to another. These methods are used in animation because they create movement that seems more natural and fluid, as opposed to something more rigid and stiff that is more linear.


In the above image you can see the arc motions that are applied to animation techniques. This works with the swinging of arms, running cycles or anything that involves fluid seamless movements or gestures. 

Secondary Action

A secondary action is quite self explanatory, it is an action that takes place after the first, in most cases this can add a lot of realism and complexity to animation below is n image which shows exactly what happens with fast action movement. 

As you can see in the above image it shows the different stages of almost instantaneous change, it shows the change from action one to action two. 

Timing

Timing is one of the fundamentals of all animation techniques  plenty of time needs to be spent making the timing of each movement perfect, as it will dictate the overall feel of the animation itself. 
 In the above picture you can see the stages of which a bird flaps its wings, timing would need to be taken into consideration for this particular animation, the flapping down on the wings would be very swift and fast motions so there would be less frames where as the glide would be an elongated state where things are much slower. By slowing down the time (extending the frames) it would give the illusion of slower movement. 

Exaggeration

This is the process of exaggerating a pose, most realistic poses can seem quite dull and boring, this isn't because of the person, its because it is our nature to move in a certain way, and when that is pushed to the extremes everything seems more interesting and lifelike. 
Above is an example of an exaggerated pose of a panda looking in the distance, now normally a person would be stood up straight looking straight ahead, but by shifting the characters   of gravity, and pushing the body to its most extreme points, it allows us to create appeal and intriguing poses. 

Solid Drawing

This is a very important principle to understand for all animators, but the practise of it is not as necessary as it use to be because modern technology allows animators to do everything digitally now. 

It is the practise and understanding of three dimensional space, this is usually done through life drawing or stills. It includes lighting, shading, volume, weight, depth and balance. It focuses on the major values of drawings which allow the animator to portray depth and interesting drawings that pop off the page. 
The above image shows life drawings, you can see that the artist has portrayed the values very well and it makes the characters look very three dimensional, this works well for realistic animation but it also helps the animator to understand anatomy and lighting techniques in modern day technology. The actual practise of drawing is invaluable. 

Appeal

This is what makes us fall in love with characters in film and games, the  appeal of a character in animation is the equivalent of an actors charisma in film. This is so important, all of the above elements connect to this very last one. Does the character have appeal? is it lovable, will is suit the target audience its aimed at, if so your good to go!
This concludes the twelve main principles of animation, once all of these are mastered your animations will heighten in quality and will hopefully inspire others, that is my aspiration, i wish to inspire others with the work i have created, and i think the most incredible feeling you could feel is when someone appreciates your work and you make other people smile.