Some of the things we covered revolved around simple animations, like a man pushing a box. Depending on how the box is pushed, the curvature of the spine will depict the follow through of the character who is pushing forward.


As you can see above, having the spine curved in suggests the box isn't as heavy as opposed to having the spine protruding out, if the spine is the opposite it suggests strain and the tensing of the body.
Changing the attitude of the body has a great impact on how the external object will be translated, be it light as a feather or extremely heavy.
Some of the things that were also covered are things we learnt from last year but it was basically a refresher. I found that lots of little things can make the biggest impact, for example, avoiding twinning, a very symmetrical character can be quite a dull and boring character to look at, its good to be asymmetric.
Key framing is also very important, by keying the things you change doesn't mean that everything else shouldn't be keyed. If the time slider is moved when everything else isn't keyed, the animation can fall sideways and cause you problems.
Tips: Key everything, this is simple simple go to the 'Channel Box' and hit 'Channels > Key All'.
Planning the Pose
Planning is essential for a strong effective pose, to create something marvellous and believable you need to think about certain factors of a animation and break it down into size-able chunks.
There are lots of different ways of approaching an animation after planning it out, but the way i like to do it, is how i was taught by Sam my lecturer in my first year, we are also retouching on it this year.
It involves phases of animation, say for example I was animating a sports character swinging a bat; I would start by planning it as follows:
Idle Pose - This would be the pose that you see when the character is holding the bat in a relaxing state.
Idle Extended - This pose is self explanatory, its the same as the above but has more frames and there are move varied movements such as the head turning or the arms moving.
Anticipation - This is the preliminary stages before the bat is about to swing, eventually leading up to the swing.
Impact - This is the stage where the bat would hit the ball and in this case, there would be a small sudden shock through the character to portray a strong hit.
Follow Through - This is the stages after impact and anticipation, where the character would bring the bat down to a lower state just before he reaches a less tense state.
Idle - This would be the same pose as the first, the character would be fully relaxed and at ease again.
So as you can see there are lots of different stages that can really affect how a short cinematic could be played out.
I will put an animation below of my first Idle pose which will portray my SWAT character in a idle state. I have gone to the effort to gather primary research for idle breathing, I filmed Alex in my group doing an idle then leading on to extended idle, this proved useful as i was able to use the video as a point of reference. By doing independent research, it also helps you understand anatomy more and how the body works.
These are fundamental poses and all animations use them for realism, I will also be including silhouettes of the character pose so I can show it is believable.


The animation should appear in the view box.
Now that the animations have been imported, you should have two of the same cycle imported. This means that you can now position the animation clips by simply initiating a Left Click and Drag.
 Also at the bottom left you will see your anim's layer, as you can see mine is set to SWAT. This isn't very important to know now but when you are working with more advanced techniques, its a handy thing to know about, because you can differentiate what layers you are working with.

Another little trick you can do is change the actual frames of the animation, as shown in the image to the left. You can easily cut clips by simply Left Click Dragging the small box in the top right corner of the animation clip.
Blending animations allows for two animations to edge in and out, this will create a nice transition between the two. To do this Right Click > Blend > (Box).

Once the window has appeared, click the drop down menu labelled Initial Weight Curve and click Ease In Out.
This pretty much concludes the Trax Editor, i hope it has been insightful and useful to those who read this blog, I found it very useful and it is how i produced the long breathe cycle in the video above.
It is a very powerful tool and one to definitely be mastered, It can save time and stress too!
There are lots of different ways of approaching an animation after planning it out, but the way i like to do it, is how i was taught by Sam my lecturer in my first year, we are also retouching on it this year.
It involves phases of animation, say for example I was animating a sports character swinging a bat; I would start by planning it as follows:
Idle Pose - This would be the pose that you see when the character is holding the bat in a relaxing state.
Idle Extended - This pose is self explanatory, its the same as the above but has more frames and there are move varied movements such as the head turning or the arms moving.
Anticipation - This is the preliminary stages before the bat is about to swing, eventually leading up to the swing.
Impact - This is the stage where the bat would hit the ball and in this case, there would be a small sudden shock through the character to portray a strong hit.
Follow Through - This is the stages after impact and anticipation, where the character would bring the bat down to a lower state just before he reaches a less tense state.
Idle - This would be the same pose as the first, the character would be fully relaxed and at ease again.
So as you can see there are lots of different stages that can really affect how a short cinematic could be played out.
I will put an animation below of my first Idle pose which will portray my SWAT character in a idle state. I have gone to the effort to gather primary research for idle breathing, I filmed Alex in my group doing an idle then leading on to extended idle, this proved useful as i was able to use the video as a point of reference. By doing independent research, it also helps you understand anatomy more and how the body works.
These are fundamental poses and all animations use them for realism, I will also be including silhouettes of the character pose so I can show it is believable.
Below you can see my first idle, it is only 40 frames long and that is all it needs to be because the start and the end frames are the same, which means they can be looped and last say 160 frames or more using the Trax editor. I will go into this in extensive detail soon.
Below you can see a silhouette of the idle breathe, the pose is very strong and easy to read because everything is nicely spaced out and there isn't any negative spacing. This is the key to finding a strong pose, by asking yourself, Does it look readable?

Trax Editor
This is Maya's very own animation tool, in most cases it is a lot more powerful than the graph editor or the dope sheet as it allows you to arrange you different sequences of animation clips, and stitch them together seamlessly. This allows for a very accurate illusion of continuous movement.

As you can see above, the Trax editor is broken up into different time lines, you can import animations, sound files, image files and its all very customisable and easy to use. The time line showing your key frames is along the bottom, whilst the main menu is at the top. It is within the track control area where the magic happens though, all of those blue and green blocks are animations, positioned carefully, as you can see each animation tends to follow the one prior in a consecutive fashion.
I will now go through the Trax editor process and who you exactly how its used step by step. When Sam showed us this I decided it would be better to try and experiment with it a little more so i decided not to use the Max for Maya rig but instead, i used the Norman rig. I prefer this rig and i would like to try following the same tutorial but using different mediums.
So the first step is to select the character itself and left click on the root controller which everything is parented to. In this case its the base controller.

As you can see on the left, I have selected the master controller, the only problem being, is that not all of the keys for every controller are showing, this is due to the hierarchy, the most simple way to fix this is in the next step.

In this step you can see that I have selected all of my hierarchy now and all of the key frames have appeared.
The easiest way to do this is by clicking Edit > Select Hierarchy this will make all key frames appear.

Next we need to create a character set, this will make a record of all keyed out frames and relate each frame to the controller it corresponds with. In a nutshell, it records the rigs animated motion paths.
The way to do this is by changing the tool bar tab to Animation, Next hit Character > Create Character Set > (Box)

Now that we have done that, make sure the settings are exactly as follows.
> Change Name Box
> Select All Hierarchy Below Selected Node
> Check All Keyable
Finally click Create Character Set

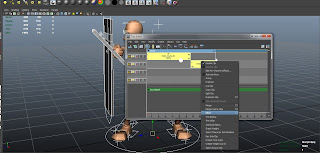
When the character set has been created, you will see the channel box go yellow, if this doesn't happen go back and look over some of the previous steps as you may have missed a stage.
Now to get into the Trax Editor.

Now that we have created the character sets we need to delve a little into the Trax Editor.
The easiest way to access this piece of kit is by using the following steps.
Click Window > Animation Editors > Trax Editor.
A window should appear.

Once a window has appeared, navigate your way to the upper menu and search for/click Create > Animation Clip > (Box)

These steps are very important, make sure the following settings have been selected and you have double checked, this can really interrupt your work flow if you select anything wrongly by mistake.
> Change Name Field
> Select Time slider
> Select Put Clip in Trax Editor and Visor

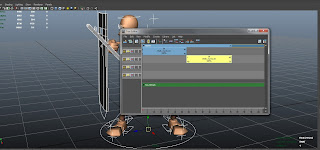
Once you have created the animation clip, it will appear as a blue box as you can see in the image to the left.
Now that the animation clip has been created, we need to export it so it can be used over and over.
Next go to File > Export Animation Clip

When the files have been exported, we then need to import the animation back in.
To do this go to File > Import Animation Clip to Characters
The animation should appear in the view box.

Now that the animations have been imported, you should have two of the same cycle imported. This means that you can now position the animation clips by simply initiating a Left Click and Drag.
 Also at the bottom left you will see your anim's layer, as you can see mine is set to SWAT. This isn't very important to know now but when you are working with more advanced techniques, its a handy thing to know about, because you can differentiate what layers you are working with.
Another little trick you can do is change the actual frames of the animation, as shown in the image to the left. You can easily cut clips by simply Left Click Dragging the small box in the top right corner of the animation clip.

Blending animations allows for two animations to edge in and out, this will create a nice transition between the two. To do this Right Click > Blend > (Box).

Once the window has appeared, click the drop down menu labelled Initial Weight Curve and click Ease In Out.
This pretty much concludes the Trax Editor, i hope it has been insightful and useful to those who read this blog, I found it very useful and it is how i produced the long breathe cycle in the video above.
It is a very powerful tool and one to definitely be mastered, It can save time and stress too!
No comments:
Post a Comment